Self Hosting Part IV - Deploying Kubernetes
17 Jun 2023At this point I have three Lenovo Thinkcentre M710q with Ubuntu Server 22.04.2 LTS and internet access, so everything is ready for the Kubernetes deployment.
I’m not willing to go through the hard way, but I also believe, that a microk8s or k3s cluster could have some limitations down the road, so after reading about some of the available deployment tools comparing them, I decided to go with kubespray.
The project has a very active community, uses some technologies like Ansible and jinja templates that I’m not entirely unfamiliar with, and provides playbooks for deployment, upgrades and so on, so let’s get started. My network topology remains unchanged:
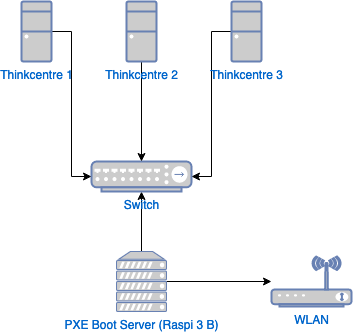
Therefore, I’ll the Raspberry Pi again to perform the Kubernetes deployment on the target machines.
Requirements for the nodes (target machines)
- Internet access to pull containers’ images;
- Disable the firewalls;
- Allow IPv4 forwarding. To do this, uncomment the line
#net.ipv4.ip_forward=1in the file/etc/sysctl.conf, then reload the file:
sudo sysctl -p
Requirements for the machine running Ansible commands
In my case, this is going to be the Raspberry Pi.
The Ubuntu servers get their IP addresses from DHCP (dnsmasq), so I set static addresses to /etc/dnsmasq.conf.
dhcp-host=<MAC-ADDRESS>192.168.10.10 #node1
dhcp-host=<MAC-ADDRESS>192.168.10.20 #node2
dhcp-host=<MAC-ADDRESS>192.168.10.30 #node3
I’ve experienced conflicts when using the network 169.254.0.0/16, and my first deployment attempt failed with this error:
The recommended value for "clusterDNS" in "KubeletConfiguration" is: [xxxxxx]; the provided value is: [xxxxxx]”
Thus, avoid this network range if possible.
Restart the dnsmasq service:
sudo systemctl restart dnsmasq
Configure SSH Key-Based authentication:
ssh-key
ssh-copy-id -i ~/.ssh/id_rsa.pub ubuntu@node1
ssh-copy-id -i ~/.ssh/id_rsa.pub ubuntu@node2
ssh-copy-id -i ~/.ssh/id_rsa.pub ubuntu@node3
Clone the kubespray repository and install the dependencies via pip:
cd ~
git clone https://github.com/kubernetes-sigs/kubespray.git
cd kubespray
python3 -m pip install -r requirements.txt
Check if ansible is available on your $PATH:
ansible --version
If it doesn’t work, try:
python3 -m pip show ansible
Name: ansible
Version: 5.7.1
Summary: Radically simple IT automation
(...)
Location: /home/me/.local/lib/python3.9/site-packages
Then add the Location to the path:
sudo echo "PATH=\"$HOME/.local/lib/python3.9/site-packages:\$PATH\"" >> ~/.profile
Kubernetes Deployment
Generate the Ansible inventory files with the IP addresses of the target servers:
cd ~/kubespray
cp -rfp inventory/sample inventory/mycluster
declare -a IPS=(192.168.10.10 192.168.10.20 192.168.10.30)
CONFIG_FILE=inventory/mycluster/hosts.yaml
python3 contrib/inventory_builder/inventory.py ${IPS[@]}
Start the deployment…
ansible-playbook -i inventory/mycluster/hosts.yaml \
cluster.yaml --become --user=ubuntu \
--private-key=~/.ssh/id_rsa -v
It’ll to take a while and it should show something like this if the deployment is successfull:

To check if everything is ok, connect to one of the Control Plane nodes. You can find it in the inventory/mycluster/hosts.yaml file. For example, here node1 and node2 have the control plane role:
(...)
    children:
    kube_control_plane:
        hosts:
        node1:
        node2:
(...)
ssh ubuntu@node2
sudo kubectl get node
NAME    STATUS  ROLES           AGE     VERSION
node1   Ready   control-plane   59m     1.26.5
node2   Ready   control-plane   58m     1.26.5
node3   Ready   <none>          55m     1.26.5
Accessing Kubernetes Cluster from a workstation
Install kubectl on the workstation, then copy the file /etc/kubernetes/admin.conf from one of the control plane nodes.
sudo mkdir ~/.kube
ssh ubuntu@$node2 'sudo cat /etc/kubernetes/admin.conf' > ~/.kube/config
Set the variable KUBECONFIG so kubectl knows where to find the configuration, eg.:
export KUBECONFIG=~/.kube/config
I’ working on a Mac, so to persist it permanently, I’ve set it in my zshrc.
Edit the file ~/.kube/config and change the IP 127.0.0.1 for the IP address of the control plane. Note that it uses the port 6443, so configure your firewalls if necessary:
#server: https://127.0.0.1:6443
server: https://[CONTROL_PLANE_IP]:6443
Let’s try it:
fabio@mac-air ~ % kubectl get nodes
NAME    STATUS   ROLES           AGE    VERSION
node1   Ready    control-plane   128m   v1.26.5
node2   Ready    control-plane   127m   v1.26.5
node3   Ready    <none>          123m   v1.26.5