Self Hosting Part III - Enabling Internet Access
11 Jun 2023The Ubuntu installation with a PXE server on all the three machines was successfull (an overkill… I know…) and you may have already noticed the next problem to solve.
It’s time to install and set up the kubernetes cluster, but the ThinkCentres running Ubuntu Server don’t have internet access.
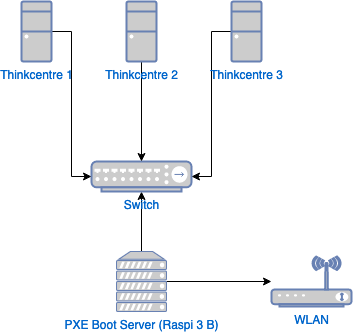
The Lenovo Thinkcentre M710q doesn’t have a WiFi card and I have no easy way of connecting them directly to the router with cables.
However, they do have a connection to the eth0 interface of the Raspberry Pi’s (network 192.168.10.0/24), and the Raspberry Pi is connected to the WLAN router via its wlan0 interface (network 192.168.1.0/24). Wouldn’t it be great if the Raspberry Pi could act as a router, providing internet access for the Ubuntu servers?
To do this, the Raspberry Pi needs to be set up as follows:
- Allow DNS traffic;
- Enable IP forwarding;
- Set firewall routing rules;
- Enable NAT.
Allow Domain Name System (DNS) Traffic
In the previous post we’ve already installed and configured dnsmasq on the Raspberry Pi. With that setup, the Ubuntu servers already recognise the eth0 interface on the Raspberry Pi as the default gateway.
Checking the dnsmasq logs (/var/log/dnsmasq.log) I found the following entry:
dnsmasq[3606]: using nameserver 192.168.1.1`
This is the IP of my wireless router and has been automatically identified by dnsmasq, so we should allow DNS traffic:
sudo ufw allow dns
Enable IP forwarding
To enable IPv4 packet forwarding, uncomment the following line in /etc/sysctl.conf:
net.ipv4.ip_forward=1
Then, to allow the Raspberry Pi to route packets between its interfaces, uncomment the following in /etc/ufw/sysctl.conf:
net/ipv4/ip_forward=1
net/ipv6/conf/default/forwarding=1
net/ipv6/conf/all/forwarding=1
Firewall routing rules and policy
This will allow all traffic destined for wlan0 and coming in on eth0 to pass through the firewall:
sudo ufw route allow in on eth0 out on wlan0
Restart the firewall for the changes to take effect:
sudo ufw disable
sudo ufw enable
Enable Network Address Translation (NAT)
So now the packets coming in on Raspberry Pi’s eth0 interface are being forwarded to the wlan0. BUT, the eth0 packets are coming from the 192.168.10.0/26 network, and the wlan0 is on the 192.168.1.0/24 network, so unfortunately in this scenario just forwarding the packets won’t be enough, some Network Address Translation (NAT) is required.
The following iptables command will do the trick:
sudo iptables -t nat -A POSTROUTING -o wlan0 -j MASQUERADE
After that, the Ubuntu servers had internet access and I was able to install and update some packages, so let’s try to understand what does this command actually does.
- -t, –table: the packet matching table that the command should operate on (
natin our case). Thenattable is consulted when a packet that creates a new connection is encountered. It can handle PREROUTING (to modify packets as they come in), OUTPUT (to modify locally generated packets before routing), and POSTROUTING (to modify packets as they are about to go out). - -A, –append: appends one or more rules to the end of the selected chain.
- -o, –out-interface: the interface to send a packet through (for packets entering the POSTROUTING chain).
- -j, –jump: specifies what to do if the packet matches the rule.
- MASQUERADE: only valid for the nat table, in the POSTROUTING chain. It should only be used with dynamically assigned IP connections and specifies a mapping to the IP address of the interface which the packet is going out from (wlan0).
Note: the iproutes rules are not persisted. To persist them so that they are applied after a reboot, use the iptables-persitent package.
sudo apt-get install iptables-persistent
After the installation, the package will automatically offer to save the rules to the appropriate IPv4 and IPv6 files below: /etc/iptables/rules.v4 /etc/iptables/rules.v6
To save the rules explicitly you can also use the following commands:
sudo iptables-save > /etc/iptables/rules.v4
sudo ip6tables-save > /etc/iptables/rules.v6
To remove rules, edit the corresponding /etc/iptables/rules.v* file and delete the lines containing the unwanted rules.