libfprint, a microservice approach
15 Nov 2019I was looking for ways to integrate fingerprinting in one of my projects some time ago when I’ve found the C library libfprint.
At the time I’d like to implement a fingerprint system using only Java or C#, but I didn’t find anything relevant. What I’ve found was a helpful bridge to use libfprint in Java applications and I’ve used that in a Spring Boot project to have some web interface.
It was not optimal in my opinion, because libfprint is totally synchronous and needs constant interaction with the users for enrollment, verification and identification, while Spring Boot rest services are intent to be asynchronous and stateless.
Now I got some time to proceed with my investigation and besides improving the overall implementation to have libfprint working with a web environment, I’d like to store the enrolled fingerprints in a database, then retrieve them later for verification and identification.
For the development, I’ve run the Spring Boot application and the MySQL database on a (Mac) machine, while the C libfprint services mentioned on the next steps run in the Raspbery pi with compatible fingerprint scanners connected to it.
I had a Raspberry Pi 3 and OS Raspian Buster and I believe that if you try it in a different OS the steps might be slightly different.
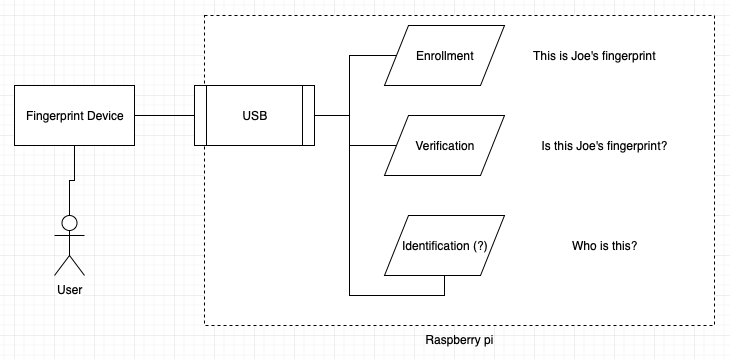
This is the architecture overview and the steps to run the demo:
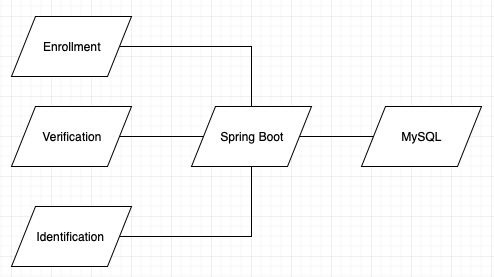
We have three fingerprint services: enrollment, verification and identification. They communicate with the Spring Boot rest services that has the connections with the MySQL database and manages a websocket (queue) that updates the user web interface.
- This demo uses a MySQL database with just a table
users.
   CREATE DATABASE IF NOT EXISTS libfprint;
   USE libfprint;
   CREATE TABLE IF NOT EXISTS `users`(`id` int(11) NOT NULL AUTO_INCREMENT,`name` varchar(45) DEFAULT NULL,`email` varchar(45) DEFAULT NULL,`fingerprint` blob,PRIMARY KEY (`id`));
   GRANT ALL PRIVILEGES ON libfprint.\* TO 'libfprint'@'%' IDENTIFIED BY '123456';
- Set up the
application.ymlof the Spring Boot application so it points to your database:
   spring:
   profiles: dev
   datasource:
   driver-class-name: com.mysql.jdbc.Driver
   url: jdbc:mysql://localhost:3306/libfprint
   username: libfprint
   password: 123456
- Install the pre-requisites in your Raspberry pi to compile libfprint:
$ sudo apt-get update
$ sudo apt-get install python3 python3-pip python3-setuptools \
 python3-wheel ninja-build \
 cmake glib2.0 libusb-1.0 \
 libnss3-dev libxcb-xv0-dev libxv-dev \
 gtk-doc-tools
$ pip3 install --user meson
$ pip3 install meson
Notice here that meson is not set automatically in the $PATH. In my installation it was available on home/pi/.local/bin/meson (I was logged in as pi user). Double check it because it will be necessary for the compilation.
- Download libfprint v1.0 sources in your Raspberry pi and unzip it:
$ cd /tmp
$ wget https://github.com/freedesktop/libfprint/archive/V_1_0.tar.gz
\$ tar -xvf V_1_0.tar.gz- Compile libfprint:
   $ cd libfprint-V_1_0
$ /home/pi/.local/bin/meson builddir
   $ cd builddir
$ ninja
- Download and compile facil.io:
   $ cd /tmp
$ wget https://github.com/boazsegev/facil.io/archive/0.7.3.tar.gz
   $ tar -xvf 0.7.3.tar.gz
$ cd facil.io-0.7.3/
   \$ make lib
- Now we’re good to compile and run
enroll.c,verify.candidentify.cfrom raspi-libfprint.
You can use the same syntax to compile all of them. Just specify the name of the output and the .c file. Below for example is the compilation of the enrollment service:
\$ gcc -Wall -o "enroll" "enroll.c" -I "/tmp/libfprint-V_1_0/libfprint/" -lm "/tmp/libfprint-V_1_0/builddir/libfprint/libfprint.so.0" -I "/tmp/libfprint-V_1_0/builddir/libfprint/" -Im "/tmp/facil.io-0.7.3/tmp/libfacil.so" -I "/tmp/facil.io-0.7.3/libdump/include/" -Wl,-rpath=/tmp/libfprint-V_1_0/builddir/libfprint/,-rpath=/tmp/facil.io-0.7.3/tmp/- Set the environment variables WEBSERVER and WEBSERVER_PORT as super user. It is the Spring Boot application address:
   root# export WEBSERVER=`IP address where the Spring Boot app is running`
   root# export WEBSERVER_PORT=`port number where the Spring Boot app is running`
- Run the enrollment, verification or identification service. You must run as super user, because libfprint needs full acess to the fingerprint scanners:
root# ./enroll
- All the
enroll.c,verify.candidentify.cexpose the same port (3000), so you must change it in the source code if you want to run them simultaneously. Then change also theapplication.ymlon the Spring Boot project so it point to the correct services’ addresses and ports.
    libfprint:
    uris:
    enroll: "http://192.168.2.124:3000"
    verify: "http://192.168.2.124:3001"
    identify: "http://192.168.2.124:3002"
The project raspi-libfprint is available on github here. If you have any question or trouble, please create a new issue on the github project.